


During web application design some time we required to upload local files to server. Let’s talk about a job portal, where candidates need to upload their career profiles. To provide this facility we need to implement file uploading in our application. If your application is designed using Microsoft Technology ASP.NET compare to other languages in web it is very easy to implement File uploading. In the below example I created a sample application to implement ASP.NET File Upload to Server.
To implement ASP.NET File Uploading Create a new web project using Visual Studio. Then in the root folder add a folder “upload”. Look at the code below in my Default.aspx.vb file I used Server.MapPath to generate the path for file uploading. Here I used the folder upload, where user file will store. You can update this as per your folder structure.
Understanding the FileUpload Control
The FileUpload control is a powerful tool that provides an easy way to allow users to send files from their local system to a web server. With this control, developers can efficiently handle file uploads while also ensuring they meet security standards. The control enables applications to collect essential information from users, which can be critical for operations like applying for jobs.
Look at my aspx file to make this presentation simple I used one ASP.NET file uploader control & a button. On click of my button btnUpload I am calling the file uploader SaveAs method with the parameter file path. By declaring fileUploader.FileName I am uploading the file with similar name. If you want to generate different file name for uploaded files you can implement your logic here.
Keep remember by default file uploading supports the maximum size 4096 (4 MB) file. To upload larger file you need to update your web.config file as below.
<configuration>
<system.web>
<httpRuntime maxRequestLength="Size in KB" />
</system.web>
</configuration>
Default.aspx
<%@ Page Language="VB" AutoEventWireup="false" CodeFile="Default.aspx.vb" Inherits="_Default" %> <!DOCTYPE html PUBLIC "-//W3C//DTD XHTML 1.0 Transitional//EN" "http://www.w3.org/TR/xhtml1/DTD/xhtml1-transitional.dtd"> <html xmlns="http://www.w3.org/1999/xhtml" > <head runat="server"> <title>ASP.NET File Upload to Server Example</title> </head> <body> <form id="frmUpload" runat="server"> <asp:FileUpload ID="fileUploader" runat="server" /><br /> <br /> <asp:Button ID="btnUpload" runat="server" Text="Upload File" /> <br /> <br /> <asp:Label ID="lblStatus" runat="server"></asp:Label> </form> </body> </html>
Default.aspx.vb
Partial Class _Default
Inherits System.Web.UI.Page
Protected Sub btnUpload_Click(ByVal sender As Object, ByVal e As System.EventArgs) Handles btnUpload.Click
'Checking is file uploader control has any file.
If fileUploader.HasFile Then
Try
'Using SaveAs method to upload the file.
fileUploader.SaveAs(Server.MapPath("upload/") & fileUploader.FileName)
'After Successfully file uploaded show msg to user.
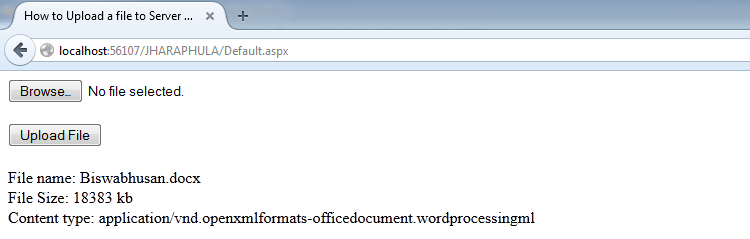
lblStatus.Text = "File name: " & fileUploader.PostedFile.FileName & "<br>" & "File Size: " & fileUploader.PostedFile.ContentLength & " kb<br>" & "Content type: " & fileUploader.PostedFile.ContentType()
Catch ex As Exception
'Handling exception if any.
lblStatus.Text = "ERROR: " & ex.Message.ToString()
End Try
Else
'Showing msg if user hit on upload button without selected a valid file.
lblStatus.Text = "You have not specified a file."
End If
End Sub
End Class
Conclusion
The capability to upload files in a web application is essential, especially for platforms like job portals where candidates frequently submit their resumes. By using the FileUpload control, developers can create a seamless experience for users while ensuring the application remains secure and efficient. Implementing proper validation and feedback mechanisms will further enhance the effectiveness of file uploads, making them a vital feature of any job application platform.